Back Workout at Home Without Equipment
A practical no-equipment back workout, what floor exercises can train, and when you need a safe pulling option to keep progressing.
If you have no equipment, you can still train parts of your back at home. You can practice shoulder-blade control, challenge the muscles that extend the trunk, build tolerance for controlled prone work, and use isometrics to make light positions more demanding. What you cannot do indefinitely is create a progressively heavier horizontal or vertical pull from open floor space alone. ACSM position stand
That distinction matters. A back workout is not defined by whether an exercise makes the area between your shoulder blades feel warm. It is defined by the movement and resistance you can repeat with control, recover from, and eventually make harder. The U.S. Physical Activity Guidelines call for muscle-strengthening activity of moderate or greater intensity involving all major muscle groups on two or more days each week; the back is one of those groups. The Guidelines also list bodyweight work as one possible form of strengthening activity, but the effort still has to be meaningful for the muscles being trained. Physical Activity Guidelines for Americans
This guide is for generally healthy adults who have a clear floor, no pull-up bar, no band, and no known-safe anchor point. It gives you a useful zero-equipment session and a sensible rule for when to change the setup. It does not use doors, tables, cabinets, or improvised furniture as an anchor. A household object can look solid and still fail, slide, tip, or have hardware that was never designed for bodyweight loading.
What “back training” can mean when you only have the floor
Evidence for this section: De Ridder et al., 2013; ACSM position stand.
Your back is not one muscle. For this practical problem, it helps to separate four jobs.
- Latissimus dorsi and the larger pulling muscles help produce shoulder extension and adduction during rows and pull-ups.
- Scapular muscles around the shoulder blades help control their position as the arms move.
- Spinal extensors, including the erector spinae and multifidus, contribute to controlled trunk extension and endurance.
- Rear shoulder muscles help with shoulder movement and can work during prone arm patterns.
Those jobs overlap, but they are not interchangeable. A prone arm sweep can make the upper back work. A bird dog can ask the trunk to resist movement. Neither recreates the external resistance of a row, where the arms pull the torso toward a fixed point, or a pull-up, where the torso is pulled toward an overhead anchor. This is a mechanics issue, not a motivation issue.
In a study of extension exercises, De Ridder and colleagues measured activity in several posterior-chain muscles, including latissimus dorsi, spinal extensor muscles, multifidus, and gluteus maximus. The study found that the selected trunk-extension tasks recruited the posterior chain, with trunk extension producing higher average activity than leg extension in that sample. It was an observational EMG study, not a long-term muscle-growth trial, so it supports using controlled extension patterns as a way to load those muscles during a session; it does not prove that every floor exercise will build the same size or strength as a progressive pulling program. De Ridder et al., 2013
That is the honest starting point. Floor work is real work, especially when you are new to it or returning after time away. It also has a ceiling. Give the session a specific job: control, endurance, practice, or a temporary minimum. That is more useful than treating every back sensation as proof of a complete program.
The no-equipment back workout: a 15-minute starting session
Evidence for this section: Physical Activity Guidelines for Americans; De Ridder et al., 2013.
Do this session two non-consecutive days per week to begin. It is not a treatment plan for back pain and it is not a test of how hard you can arch your lower back. The goal is controlled effort with a calm neck, steady breathing, and movements you can repeat without a sharp or spreading symptom.
Before the first round, lie face down and make a small adjustment: gently lengthen through the crown of your head, let the shoulders move away from the ears, and keep your ribs from flaring aggressively. There is no prize for the biggest range. A modest range that you can own is more useful than a dramatic shape you cannot control.
1. Prone reverse snow angel — 2 sets of 6 to 10 slow repetitions
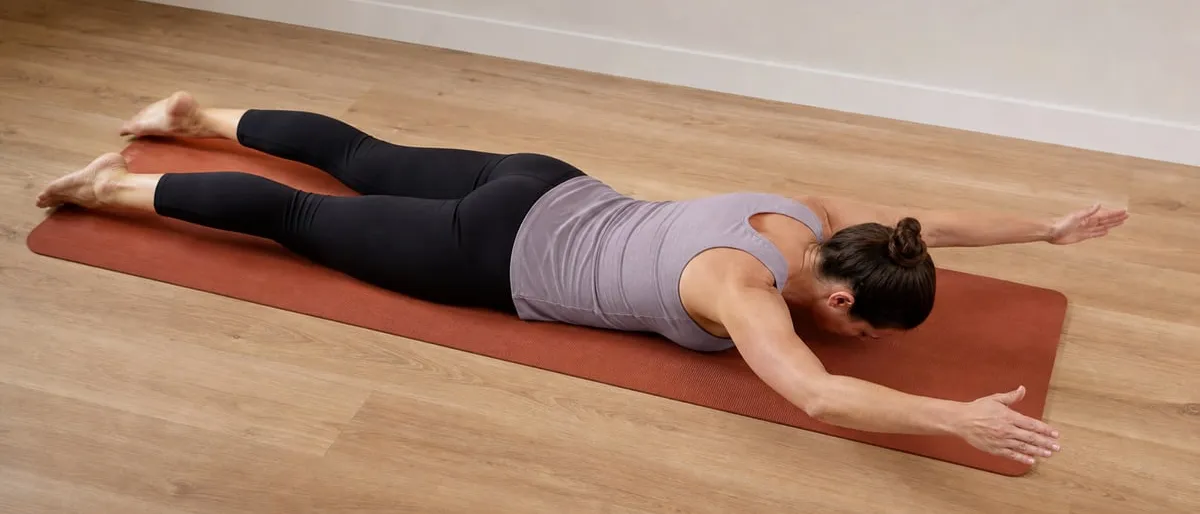
Lie face down with your forehead on a folded towel or with your gaze down. Place your arms near your sides, palms facing the floor or your thighs. Keeping the elbows soft, sweep the arms out and overhead only as far as you can do without shrugging or forcing your shoulders toward your ears. Reverse the path with the same pace.
Treat this as a shoulder-blade and rear-shoulder control drill, not as a contest to lift your hands high. If the overhead part feels pinchy, shorten the arc and work between your hips and a comfortable angle beside your body. The floor provides a light gravitational challenge; the slow tempo keeps the movement from turning into a fast arm swing. The exercise is useful when it is controlled, but it is not a substitute for a loaded row.
2. Prone Y, T, and W — 1 to 2 rounds of 5 to 8 repetitions in each position
Stay prone. For a Y, reach the arms diagonally forward; for a T, reach them out to the sides; for a W, bend the elbows and draw them closer to your ribs. Lift only as much as you can without cranking your neck or overextending your lower back. Pause briefly, then lower with control.
Do not chase a precise “best” arm angle. The goal is to explore positions your shoulders tolerate while the shoulder blades move with control. The 2026 laboratory study on prone scapular-retraction exercise found that arm position changed trapezius activation patterns in healthy, active participants. That kind of EMG evidence can inform exercise selection, but it does not tell you which exact angle is medically correct for every shoulder. Use the comfortable position you can repeat well. Gurses et al., 2026
3. Short-range prone trunk lift — 2 sets of 6 to 10 repetitions
Place your hands beside your temples or along your sides. Exhale gently, then lift your breastbone a small distance from the floor while keeping the neck long. Lower slowly. Your pelvis stays heavy on the floor; the movement comes from a small, controlled trunk extension rather than a forceful bend from the low back.
The purpose here is to give the posterior chain a controlled extension task. De Ridder and colleagues compared extension variations in young, asymptomatic adults, so the study is relevant to a healthy-reader workout but cannot be used to prescribe this movement for someone with a painful back or a recent injury. If this position causes pain, numbness, tingling, or symptoms that travel into a limb, stop the exercise rather than trying to push through it. De Ridder et al., 2013
4. Elbow press isometric — 2 sets of 15 to 30 seconds
Lie face down with the elbows bent about 90 degrees and close to your sides. Press the elbows gently but firmly into the floor as if you were trying to pull the floor toward your hips, while keeping the shoulders away from the ears. Nothing needs to move. Build pressure gradually, hold while breathing, then relax.
An isometric is a contraction without visible joint movement. It can be useful when you need a simple way to practice tension, but the floor is still your resistance source. Once you can create a long, steady hold with little effort, adding more seconds forever is mostly an endurance progression. For a broader explanation of how to use holds without confusing them with a complete strength plan, see our guide to isometric exercises at home.
5. Bird dog with a pause — 2 sets of 5 to 8 repetitions per side
Move onto hands and knees. Reach one leg back and the opposite arm forward only as far as you can keep the trunk relatively still. Pause for two slow breaths, return, and switch sides. Keep the movement quiet. If your hips rotate, shorten the reach or leave the arm down.
Bird dog is not a lat exercise. It is included because a back session can also practice trunk control without asking you to hold a deep prone extension. It is a sensible low-load option when you need variety, but it should not be sold as a replacement for pulling volume. If you want to audit the technique in any of these movements, use the home-workout form check before adding repetitions.
Rest long enough to make the next set controlled. For most beginners, that might mean roughly 45 to 90 seconds rather than rushing from one position to the next. The session is short because quality falls quickly when prone movements become sloppy. Stop a set when the movement turns into neck tension, breath-holding, or a bigger and bigger lower-back arch.
How hard should a floor-based back session feel?
Evidence for this section: Refalo et al., 2023; ACSM position stand.
“Go to failure” is the wrong default here. A set should require focused muscular effort while you can still hold the intended position. In a no-equipment setting, difficulty comes from the lever, range of motion, tempo, pauses, total repetitions, and how close you work to the point where technique starts to unravel.
There is no good reason to force every set to momentary failure. A systematic review and meta-analysis by Refalo and colleagues found no evidence that training to momentary muscular failure was superior to non-failure training for hypertrophy across the studies they reviewed. The evidence does not make an easy set magically productive; it means you can leave a little room for good form rather than ending every set with a strained repetition. Refalo et al., 2023
For this session, use a simple decision rule. If you can complete the top end of the repetition range with the same smooth tempo and no obvious compensation, choose one modest progression next time. You might add a two-second pause, use a slightly longer comfortable arm sweep, add one or two repetitions, or add one set. Change only one variable at a time. That makes the response of your shoulders and trunk easier to read. ACSM position stand
Do not use discomfort as a scoring system. Local muscular effort can be expected; sharp pain, numbness, tingling, dizziness, new weakness, or symptoms that spread away from the working area are reasons to stop and seek appropriate clinical advice. The same applies if you are returning after surgery, a significant injury, or an episode of back pain that has not been assessed. This page is general exercise education for healthy adults, not rehabilitation.
Why the pulling problem remains
Evidence for this section: Physical Activity Guidelines for Americans; Lopez et al., 2021.
The most important limitation of a zero-equipment back workout is not a missing “secret exercise.” It is the missing anchor. A row needs something that resists the arms pulling toward the torso. A pull-up needs something that resists the body moving upward. On an open floor, you can press into the ground and move your arms against gravity, but you cannot create an ever-heavier horizontal or vertical pull without adding a stable resistance source.
That does not make the session worthless. It makes it specific. Prone patterns can be a reasonable starting point for motor control and low-load posterior-chain work. The U.S. Guidelines include bodyweight calisthenics among examples of muscle-strengthening activity, while also specifying that the work should involve all major muscle groups at moderate or greater effort. If your back work has become so easy that it no longer asks for meaningful effort, it is time to alter the setup rather than pretending extra arm circles solve the problem. Physical Activity Guidelines for Americans
Evidence on resistance-training load also helps explain why this boundary matters. In a network meta-analysis of 28 studies involving healthy adults, Lopez and colleagues found similar hypertrophy across low, moderate, and high loads when sets were performed to volitional failure, but greater strength gains with moderate and high loads than with low loads. The review does not test reverse snow angels or prove that you must own a gym. It does support the practical point that a plan aimed at continued strength development eventually needs a way to make the task sufficiently demanding. Lopez et al., 2021
ACSM’s position stand makes the same broader programming point: progressive resistance is needed for further adaptation, and the right exercise selection depends on goals, capacity, and training status. That is why “no equipment” can be a valid starting constraint without being a permanent rule. American College of Sports Medicine, 2009
When to add a small, purpose-built option
Evidence for this section: ACSM position stand; Lopez et al., 2021.
Add an option when the current work has become easy enough that you can keep adding repetitions but cannot make the pattern meaningfully harder with control. You do not need to buy a room full of equipment. A band designed for resistance training, used with a manufacturer-approved and securely installed anchor, can introduce a row pattern. A properly installed pull-up bar can introduce a vertical pull. A coach or qualified professional can also help you choose a setup if you are unsure about an anchor or your current capacity.
The safety condition is part of the recommendation. Do not substitute a closed door, a towel in a doorframe, a dining table, a cabinet handle, a radiator, or a piece of furniture simply because a video makes it look clever. The structural condition of the object, its attachment, its friction with the floor, and its loading direction are often unknown. A fall is not a sensible trade for a marginally better row.
Once you have a verified resistance source, the program can change. You can begin with a supported row pattern, choose a resistance that allows controlled repetitions, and record what makes it hard. You can then progress through resistance, leverage, range, or set quality. The complete decision process belongs in our progressive-overload guide for home training; this article’s job is to identify when the zero-equipment version has reached its useful ceiling.
Put the session into a balanced week
Evidence for this section: Physical Activity Guidelines for Americans; ACSM position stand.
For a beginner, use the 15-minute session twice per week on non-consecutive days and pair it with leg, push, and aerobic work you can recover from. The goal is not to make every session a back-only event. It is to avoid building a home routine made entirely of presses, squats, and abdominal work while the pulling side remains an afterthought.
If you already do push-ups, pike push-ups, or floor presses, keep the limitation visible: those are presses. They can be valuable, but they do not turn into a row because you include prone arm drills later in the session. Our article on push/pull balance in home workouts explains how to review the patterns across a week. If you need a broader routine while you are still equipment-free, see upper-body training at home without weights.
Here is a simple way to judge the next four weeks:
- Week 1: Learn the session at the low end of each range. Record which positions feel controlled and which create compensation.
- Week 2: Add only a few repetitions or a brief pause where technique stayed steady.
- Week 3: Add one set to one or two movements if recovery was straightforward.
- Week 4: Decide whether the session still provides meaningful effort. If it does, keep progressing gently. If it does not, keep one floor session for control and add a safe, purpose-built pulling option for progressive resistance.
This is not a claim that four weeks will change your physique or fix a shoulder problem. It is a planning checkpoint. It interrupts the common loop of doing more easy repetitions because buying or installing appropriate resistance can feel like “giving up” on bodyweight training. It is simply a tool choice that matches the movement you want to train.
The useful, limited answer
You can do a productive back-focused session at home with no equipment: use slow prone arm patterns, a controlled short-range trunk lift, an elbow-press hold, and bird dog to practice posterior-chain and shoulder-blade control. Work within a pain-free, repeatable range and stop before form turns into compensation.
But use precise language about the result. This is a floor-based back session, not an unlimited substitute for loaded rows or pull-ups. When it stops being challenging, do not gamble on furniture or force more range. Add a verified resistance source, then build the pulling pattern progressively. That is the safer and more useful next step.
Sources
- U.S. Physical Activity Guidelines for Americans, 2nd edition
- American College of Sports Medicine position stand: progression models in resistance training
- De Ridder et al.: posterior muscle-chain activity during extension exercises
- Lopez et al.: resistance-training load effects
- Refalo et al.: proximity to failure and hypertrophy
- Gurses et al.: prone scapular-retraction exercise and muscle activation
References
Sources
Expert perspective
The American College of Sports Medicine’s position stand explains that further adaptation requires progressive resistance training and that exercise selection should reflect a person’s goal, capacity, and training status. In a no-equipment back routine, that makes the available source of resistance—not the exercise name—the central constraint.
American College of Sports Medicine · Professional association and position-stand author · American College of Sports Medicine · Source: https://pubmed.ncbi.nlm.nih.gov/19204579/