Practice getting up from the floor with a clear return route
Learn how supported floor-rise practice is taught, when to seek guidance, what research shows and how to plan a safe return before moving down.
Getting up from the floor can deserve its own practice time. You might want a more familiar way to finish a floor exercise, leave a picnic blanket or get back up after playing with a grandchild. Which route can you use with the support available to you?
This guide explains how supported floor-rise practice is taught, what to discuss with a physical therapist or qualified instructor, and how to describe progress. It is for planned practice when you are well enough to participate. After an actual fall, checking for injury and getting appropriate help come first.
A chair can be part of the skill. You do not need to make removing your hands the goal, and the sequence below is not a score for your age, fitness or life expectancy. Before attempting a new stage, establish how you will return from it. If you are unsure you can get back up, arrange an assessment rather than testing the uncertainty alone.
Choose a useful definition of getting up
For this article, the goal is to move from a chosen floor position to standing, using an agreed support and route. Write that goal in ordinary language. “From sitting on the floor beside this chair, using my hands” tells you much more than “improve mobility.” It also makes clear what you have and have not practiced.
The 2026 pilot trial by Seeley and colleagues tested floor rises using a sturdy chair. Independent success meant completing the task without another person’s help, not standing up without furniture support. Read the trial’s assessment methods. Keep that distinction in mind when watching a demonstration or reading a study result. A person using a chair and a person rising without one are completing different versions of the task.
You can define your own practice around the version that matters to you. Perhaps the immediate aim is to return from one knee beside the chair. Perhaps you already manage that transition and want an instructor to help you connect it to floor sitting. Neither goal requires a full descent on the first attempt.
An earlier randomized trial involved 35 older adults living in congregate housing who needed assistance with at least one daily activity. After six sessions over two weeks, the strategy-training group improved the number of floor-rise tasks completed; the intervention did not improve rise time. The 2002 study therefore offers a useful reminder to distinguish ability from speed.
Consider two notes: “stood up in eight seconds” and “returned from side sitting with the same chair, without a person lifting me.” These are examples of different information, not targets taken from a study. For a practical skill, the second may answer your question more directly. If you do record time, keep it secondary to what you actually completed and how much support you used.
Floor practice can sit alongside a broader strength and balance plan for older adults. That plan covers general exercise choices. Here, keep the focus on the specific transitions between the floor and standing.
Decide whether this is a practice day
Start by separating an ordinary practice session from a new difficulty that needs assessment. A recent fall, a change in mobility or pain that interferes with a movement is information to discuss with a clinician. An online sequence cannot establish why a transition has become difficult or choose the right adaptation for you.
The NHS advises seeking medical advice after a fall or when you are worried about your balance or mobility. Its falls guidance is written for UK services; arrange the equivalent appropriate care where you live. When booking, ask specifically about getting down to and up from the floor. That is a clearer request than asking for “some exercises.”
The Later Life Training home booklet says to learn backward chaining in consultation with a therapist or exercise instructor and not to attempt a stage alone if you doubt you can get up again. The booklet’s safety instructions are part of the method, not a separate detail to skip before looking at the pictures. It also asks people using it without supervised sessions to check suitability with their doctor.
Prepare a short description for that conversation. Explain which part concerns you: placing a knee down, supporting weight through your hands, moving from sitting onto hands and knees, or standing from a split position. Say whether the problem is discomfort, uncertainty about the order, or needing more help than you have available. Do not diagnose the cause yourself; describe what happens.
The 2026 trial excluded people who needed a walking frame indoors and people with specified contraindications or uncontrolled medical conditions; it also excluded participants with a body mass index of 30 or above. Those eligibility limits restrict who its findings represent. They are research criteria, not a rule that everyone outside those criteria can never practice. They do mean that the trial cannot clear an individual reader for this activity.
If floor practice is not appropriate today, choose another activity already suitable for you. Our standing workout guide explains a separate exercise format; it is not a substitute for assessment or an automatic prescription for someone with a new mobility problem.
Set up the support and the return route
Before moving down, decide where your hands will go and where the practice will finish. A chair in a demonstration is easy to overlook because it looks like ordinary furniture. In this task, its stability is part of the setup. Do not start with an unfamiliar support and discover its limitations while depending on it.
Later Life Training specifies a sturdy, stable chair, suitable footwear and enough clear space for the movement. Its first stage places the hands on the chair arms or securely on the seat while keeping the chair from tipping. Check the illustrated setup with your instructor. A photo beside a chair does not tell you whether your own chair is suitable, how it responds to pressure or which hand position works for you.
Make the room easy to describe. Where will you begin? Which side of the chair will you use? What is the lowest position agreed for today? Where will you sit afterward? You should be able to answer these questions before taking the first step. If the return route still amounts to “I will work something out,” the setup is unfinished.
The NHS recommends keeping a phone or personal alarm with you and reducing trip hazards such as clutter and loose wires. Its home-safety advice supports a simple preparation check. Think about whether you can reach your chosen way of calling for help from the floor, not just whether a phone is somewhere in the house.
If another person is present, agree on their role. They can know the planned stage, keep distractions away and help call for assistance. Their presence does not make an unfamiliar manual lift appropriate. Any physical assistance should follow the instructions given for your circumstances.
Worcestershire Acute Hospitals’ clinical pathway requires the reverse-chain method to be clinically appropriate and rescue lifting equipment to be accessible. That clinical requirement shows why a supervised rehabilitation session and an improvised home attempt are not interchangeable. It is not a request to purchase lifting equipment for a living-room workout. If your safe return depends on help or equipment you do not have, arrange the appropriate setting first.
Learn the last part of the rise first
Backward chaining gives the practice a clear order: learn the part nearest the finish before adding a position farther from standing. This allows you and the person teaching you to identify which transition is established and which still needs attention. It does not require completing the whole sequence in one session.
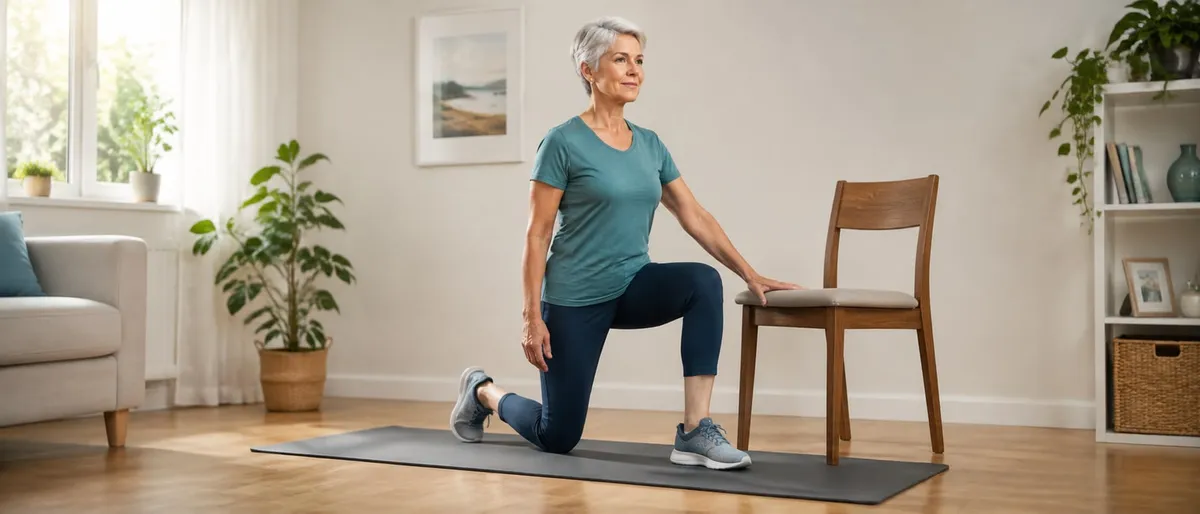
In the Later Life Training sequence, the early stages use a supported split stance, then lower the rear knee and return to standing; later stages add both knees, hands and knees, floor sitting and side lying. The home booklet illustrates those stages. Use the following overview to discuss the sequence with your therapist or instructor, rather than as permission to try every stage independently.
-
Part to discuss: Standing support
What you are trying to establish: Your agreed hand and foot positions beside the chair
What to explain afterward: Whether the setup felt clear and secure
-
Part to discuss: One knee down and back up
What you are trying to establish: The final transition into standing
What to explain afterward: Which part needed guidance or adaptation
-
Part to discuss: Both knees, then the known return
What you are trying to establish: Connecting another position to the established finish
What to explain afterward: Whether you could find the agreed foot position
-
Part to discuss: Hands and knees, then the return
What you are trying to establish: Moving between floor and chair support
What to explain afterward: Where the sequence became uncertain
-
Part to discuss: Floor sitting or lying, if appropriate
What you are trying to establish: Connecting an earlier floor position to the practiced route
What to explain afterward: Which transition should be reviewed next
The list is a conversation aid, not a checklist to complete. A successful session may stop at its first or second item. Ask the instructor to show both the movement down and the way back before you add a new position. Watching only the descent leaves half of your question unanswered.
The Worcestershire pathway says the therapist should advance only when a stage can be completed confidently and should stop when a person cannot master a stage or does not want to continue. Its progression criteria place the person’s response ahead of finishing a list. At home, follow the stages and limits agreed for you; the pathway itself is a clinical document.
For example, suppose one-knee practice is the agreed task. Your notes might read: “Same chair and hand position; practiced the return from half kneeling; next question is how to place the front foot.” That is enough information for the next conversation. There is no need to add side sitting simply because it appears farther down the page.
Adapt the difficult transition instead of forcing it
Sometimes the order is clear but one position is uncomfortable or unavailable. In that case, the next useful question is about adapting that particular transition. “How do I avoid putting pressure here?” is more informative than deciding that you either can or cannot do “floor mobility.”
The Worcestershire pathway includes adaptations for painful knees or restricted movement and advises orthopedic physical-therapy input when there are concerns about a joint replacement. Its adaptation section belongs in a clinical assessment. A different route may involve different supports and assistance; do not improvise it from a short description. A new pillow, a different chair or a change in hand position does not by itself establish that a painful movement is suitable.
The Later Life Training booklet advises stopping for joint or muscle pain, checking the position, and seeking professional advice if pain persists. That stop-and-review advice is more useful than trying to finish a chosen number of repetitions. Tell the person guiding you exactly where the discomfort appeared and which part of the route you were attempting.
Separate three questions in your notes. First, did you understand the instruction? Second, could you reach the position? Third, could you return using the agreed support? These questions can have different answers. You might understand the sequence perfectly while needing a different setup. You might find the position comfortable but be unsure where to put a hand next. Describing that distinction makes the next lesson more specific.
Keep the support visible in your definition of progress. You can become more familiar with a route while continuing to use both hands. You can also decide with a therapist that a particular route is not the right one for you. Neither decision needs to be translated into a personal score.
The 2002 strategy-training study tested several starting positions and support conditions, rather than treating every floor rise as the same task. Its task design supports being precise when discussing your own version. Record the chair, starting position and assistance, then compare like with like. A change of setup deserves a new description, even when it feels easier.
Read improvement claims with the outcome attached
A study can report improvement in one measure and no clear change in another. Keep the measure attached to the finding when deciding what it means for your practice. Completing a floor rise, completing it faster and feeling less afraid of falling are different outcomes.
In the 2026 pilot, 61 people attending community exercise classes were randomized and 49 completed follow-up. Five weekly supervised practice sessions improved chair-supported floor-rise performance compared with a video-and-discussion control, but did not significantly improve the primary fear-of-falling outcome. The trial reports both results. Its small, selected sample, baseline differences between groups and follow-up assessment by a researcher who knew the group assignments limit certainty. A successful practice session should not be presented as proof that someone will no longer fear or experience falls.
The trial also does not establish a universal home dose. Its sessions were part of a supervised study with a particular group, screening and safety arrangements. Do not convert a research schedule into a deadline by which you should complete the whole movement. Ask the person teaching you what to practice between sessions and when to review it.
A systematic review published in 2020, with searches through June 2018, found no significant pooled improvement in time to rise from the floor across the included randomized interventions; differences between studies were substantial. The review’s result is useful context for resisting a single promised improvement. It predates the 2026 trial and should not be described as having evaluated it.
For your own notes, choose information that makes the next decision clearer: the starting position, support, help received, movement that needed explanation and any discomfort. You do not need an elaborate tracker. A short sentence that you can take to a follow-up appointment may be more useful than a collection of times without the setup recorded.
The earlier training trial improved task completion without an intervention effect on rise time. That distinction is another reason to avoid making speed the sole definition of progress. Keep practicing the version agreed for you, and let the next review determine whether to extend it.
Keep an actual-fall plan separate from practice
An unexpected fall changes the decision. You may be hurt, unwell or in a different space from the one where you practiced. Remembering a familiar route does not establish that it is appropriate to use at that moment.
After a fall, the NHS advises checking for pain or injury before attempting to rise. If you may have injured your head, back, neck or hip, or cannot get up, seek emergency help. Follow the appropriate emergency process where you live. Do not use this article to rule out an injury. If you are able to rise safely, take your time and rest afterward; if you are unsure, get help rather than repeatedly testing the movement.
Make that plan concrete before it is needed. Identify the device you would use to call, the person who knows your arrangements and how help could reach you. Discuss any gaps with a relevant professional or support service. Check the arrangements in your own home; “someone will hear me” is an assumption.
Torbay and South Devon NHS Foundation Trust describes personal alert technology as a way to summon help when someone falls and cannot get up. Its falls-prevention service information treats access to help as a separate practical issue. Being able to practice one supported route does not remove that need.
If you cannot get up, the NHS advises using a reachable phone or alarm, attracting attention if necessary and keeping warm while waiting; it also says another person should not try to lift you themselves. Its after-fall guidance is relevant to the person who might be with you as well as to you. Agreeing how to call for help is more useful than assuming that person can provide an improvised lift.
For the next planned practice session, choose one clear question: the right support, the last part of the rise, or a transition that needs adaptation. Take it to someone qualified to guide that decision. Leave with an agreed starting position and a return route you understand. You can then describe what you are practicing and where to stop.
Frequently Asked Questions
5 questions answered
01
Is using a chair still a successful floor rise?
Yes, if that is the version you are practicing. In the 2026 trial discussed here, participants used a sturdy chair and independent success meant no help from another person. Record your starting position and support so that your comparisons refer to the same task.
02
What does backward chaining mean for getting up?
It means learning the part nearest standing first, then adding earlier positions to the route as appropriate. The method can begin with supported standing and a return from one knee. Agree the stages with a therapist or qualified instructor; do not attempt a position alone if you doubt you can return from it.
03
Should I practice floor rises if kneeling hurts?
Do not force a painful transition. Stop and discuss the specific difficulty with an appropriate professional, particularly if pain persists or you have concerns about a joint replacement. A different route may need a different setup or assistance; a general article cannot choose that adaptation for you.
04
How many floor rises should I do each day?
The research discussed here does not establish a universal daily home dose. Ask the person teaching you to agree the stages and practice schedule for your circumstances. Completing a clear, appropriate return route matters more than finishing a self-imposed repetition target.
05
Should I use my practiced route immediately after a fall?
First check for pain or injury and whether you can get up safely. Seek emergency help if you may have injured your head, back, neck or hip, or cannot get up. A route practiced in a prepared space does not rule out injury or establish what is appropriate after an unexpected fall.
References
Sources
Expert perspective
Seeley and colleagues studied chair-supported floor rises. Better performance in that task did not establish an improvement in the primary fear-of-falling outcome.
Shane C Seeley · Lead author of the 2026 floor-rise pilot trial · Glasgow Caledonian University · Source: https://academic.oup.com/ageing/article/55/3/afag064/8550894